Sunday 29 October 2017

Tone It Up Weekly Schedule!


Hey Girls,

Below are the links to the weekly schedule by PDF and also the YouTube playlist for the free workouts. I also threw in Beach Babe workouts for anyone who wants to use their premium workouts.

Wednesday 25 October 2017

Tuesday 24 October 2017

Cupping Week 3 - Glutes

(This is actually my glute/butt area but its well covered in the right places!)


I was dreading this session.
The part of my body I really do avoid foam rolling 😂 Especially those glute medius muscles 😬

As with last week, if you want to know the back ground of the massage technique cupping, refer to my first post HERE

So lets get a little technical when it comes to your glute muscles and how cupping can help relieve some of the tension.


Your glute/butt area is made up of different muscles:

Glute Maximus - main butt area
Glute Medius - side of butt
Glute Minimus - under the above muscles

As well as the Piriformis muscle that is connected in that region (as you cam see on the right side of the above picture)

Our glutes are the biggest muscle group in our body and do so much for us.


They help to extend, rotate and abduct our hips. Having strong glutes can improve every day living from climbing the stairs, sitting, standing and of course our posture is better.

We can strengthen our glutes until we are blue in the face but what happens if we don't stretch them, roll them, ease them up and release them?

SO many issues can arise from having a tight glute. Seriously, it's crazy.

Unless we actively use this muscle group, it can go very much unworked.

An article by 'The Glute Guy' wrote about how much we under use our glutes.
This shocked me. We only use 10% of our glutes when getting up and down from our chair. Makes sense that most of the strength would come from our hamstrings when you think about it 🍑 But still. And a lot of our society have desk jobs where we sit for 8 hours.

So the saying "lazy bums" is actually true 😂

Toilet Squat Challenge -

Everytime you go to the bathroom in work or at home, do 10 squats and make sure to squeeze those bum cheeks HARD!

So we can strengthen our glutes through strength training such as deadlifts, squats, single leg work, sprinting etc but we can also strengthen in yoga. Some pose examples would be:

Opposing Arm Leg
Fire Hydrant
Donkey Kick
Glute Bridge

Just to name a few. But you must work on that feeling of how to activate the glutes. I always so some activation moves such as glute bridge and good mornings in the gym before I start a leg workout to make sure my glutes are switched on and ready to work.

Liebenson (2006) states that if a lack of coordination is seen when walking backwards, it indicates the gluteus maximus is weak.

So off you go, try it out and see what you think 😉


So lets go back to what happens when they tighten and why a technique like cupping can help.

Issues that arise:


  • Low back pain
  • Tight IT band
  • Sore knees (runners knee)
  • Heel Pain (plantar fasciitis)
  • Achilles tendinitis
  • Shin Splints
  • Tight Piriformis muscle (from being overworked)
I tend to suffer with glute tightness because I am lazy AF with foam rolling! And my lower back aches sometimes. I think that is cause more from tight hip flexors though.

We started on my glute medius and whoa!!! This was done using the suction cups and general massage along with some elbow grease 😬 It helps to bring blood flow to the area while working out any knots.


My piriformis was pretty tight too and more so on one side than the other. It's normal to have one side stiffer than the other for different muscles.

Mines kind of strange. My left leg is stiffer than my right but my right glute med and piriformis are tighter than my left!!

We then moved on and the elbow was used to get in deep into the glute maximus. Ouch!!!
The pain is an oddly satisfactory pain though. Although you need to breathe through it, you know it's for a good reason. 

The feeling after it? AMAZING!!! Worth every bead of sweat 😂 Honestly I felt so relaxed and spacious in the car on the way home!

Is it now 3 days after the session and they still feel good. Obviously you will need more than one session to really work the kinks out, especially if you have let it build up over time.

During yoga class this morning we were practicing hip openers and they did still feel a little tight but it is up to me to keep on top of having them loose by massaging the butt area with a torture ball like the peanut 😈 This is the one I have:


Ways to soften up your tight glutes:

  • Cupping/Sports Massage
  • Foam Rolling with a hard ball
  • Epsom Salt Bath (magnesium helps relieve muscle pain and aids in relaxation)
  • Stretches such as Pigeon Pose, recline twist (my favourite), cow legs (really good for getting into the glute med & piriformis)

So to round up:

  1. Strength Glutes through strength training and body weight exercises
  2. Release tension in Glutes through massage / self massage / soaking
Easy peasy lemon squeezy 😊

Let me know if you have any questions about this topic. I'd be happy to help out!

Lastly,

COMPETITION TIME

This might be your last chance to enter and receive a free cupping/sports massage session with Kev!! 

Have a tight spot you want checked out? Feel you need to loosen up in a certain area? Well why not enter this competition and get a freebie, on us!!
Simply tag a friend on my Instagram post and follow myself & Kev. That is your entry.


Easy!

I hope you enjoy this little butt education 😋

Again, I am here if you have any queries!

Elisa x


Sunday 22 October 2017

Tone It Up Weekly Schedule


Hey everyone,

So as we know Tone It Up have a wonderful new app out.

I used it for the free trial and it is amazing to keep your accountable and show up for your workout. But if you are like me and can't afford the app right now, I have gone ahead and planned out the week per the apps workouts.

I looked at each workout on the app and weekly schedule and chose YouTube videos to match.
Some favourites of mine are in there (I love the LYB series and 2014 Bikini Series).

This is just a guide for the girls who want to keep in line with the schedule.

I have also created a YouTube playlist for you all so no need to go searching.

All details below.

PDF Download Week 3

Week 3 YouTube Playlist


Also, if anyone would like me to incorporate the DVD/premium workouts into the schedule I can as of next week (I have them all so happy to go through what workouts would suit 😊 )

Happy week 3 of #TIU21

Elisa xx


Tuesday 17 October 2017

Cupping Week 2 - Legs!!!


Following on from last weeks post, week 2 of cupping with Kev from Compound Fitness Ireland. We went for the gold and hit my legs 😖

If you want to know more about cupping, refer back to last weeks post HERE

My legs always feel tight and I am the first to admit I don't foam roll as much as I should. I also have to admit I was naive enough to think yoga every day would balance out any tightness hence the lack of foam rolling or proper muscle care. (I know I am an eejit).

So lets go through each muscle group and how I got on.

Calves (back of lower leg)

The first point of call was starting with my calves. These always feel tight but to my surprise they were not as bad as I thought in my head. Also my achilles were good too (Bren is always jealous of them - I was a sprinter before he was 😉)


When I arrived I was worried about having my calves done because they were so sore from YIN YOGA on Monday night, yes YIN! Our beautiful teacher Jenny had us hold a toe sit for about 10 to 15 minutes.... OUCH. If you have any tightness in your feet or achilles then you will definitely feel this a few days later!

(a toe sit)


But although I had muscle pain from that, the knots were actually on the medial (inside) and the lateral (outside) of my calf. Kev did his work here by massaging the area first, doing a cupping massage technique and then leaving the cups on the tight areas while he moved on.

Hamstrings

Hamstrings are an area in which I always feel tightness. But to my surprise, Kev said they are fine. 


No unusual knots. So I am starting to become aware that some of the restriction in my flexibility does not come from my hamstrings but could actually be related to my glutes (bum) both glute max and med. If they are tight I won't have my full range of motion and of course I'll feel a tightness in my hamstrings. We didn't tough on the glutes this week, that's next weeks exciting adventure!!!!

But for example in wide leg forward fold (in the picture below), if my glute max and glute med are tight, it will restrict a correct forward bend from the pelvis because the muscle will be too tight to stretch into it. 


As he did with my calves, Kev worked on both hamstrings and cupped them with not a huge amount of bruising at all.... GOOD SIGN 😃

Then we hit the money shot.....

IT Band (Iliotibial band)


Kev warned me about this.... I felt the odd twinge when he was massaging and cupping my hamstrings so I knew what was to come. 

As painful as it was, it as exactly what I needed. This was definitely the part that needed a good seeing to the most 😋

If the IT band is tight, it can cause pain in the knee joint and even in the hip.It can reduce your range of motion in your hip too.
Its a band of fibrous tissue that runs along the lateral (outside) part of your leg. 

I used to run A LOT back when I first began my fitness journey. After about a year or so I developed really bad knees. I wasn't sure why. Every time I ran my right knee swelled. So I went to a physio and he said my legs were tighter than any legs he has seen in a while, even athletes! 😂 He did acupuncture on them and it helped a bit. But it wasn't until I really paid attention to foam rolling more and warming up my leg muscles BEFORE a run that I started to see improvements. 

I guess not enough has been done because they are still in bits haha. No amount of yoga and stretching will help it. I need deep massage to work out the tension and knots in the muscle fibers of my legs and the rest of my body.

MAKE STRETCHING & FOAM ROLLING A PRIORITY! My new goal!

Other ways to help with tight muscles:
  • Hydrate
  • Take magnesium tablets
  • Have epsom salt baths (magnesium salts)
  • Sleep
Lastly we touched on (not sure that's a great term to use 😂) the....

Quads

Another extremely sensitive area for me. Anytime I am entering into a Warrior pose or even a low lunge, I feel such a pull on my quads and hip flexor! I would consider myself flexible as opposed to an average gym goer but they seriously hold me back. And again, my fault for not releasing the tension myself with a foam roller or ball.

It is ALWAYS my quads that give out when we are holding a quad dominant posture. 

For example:

Utthita Parsvakonasana (Extended Side Angle)


My quads always die in the posture after a minute or two especially if it's combined in a Warrior dancing sequence holding the postures for a few minutes each.

And Parivrtta Baddha Parsvakonasana (Revolved bound side angle pose)


Anything where my front leg is bent at a 90 degree angle is pretty much torture for me after a minute and during my cupping session I found out why.

My quads are tight AF. 

I knew this. I shy away like a little baby from foam rolling out knots. 

But it is keeping me from progressing in my practice! 

Kev also felt tightness on my inner thigh/abductor muscle which also explains a lot.
It's clearly the reason I can't do the splits. DUH.

So basically I am an uptight yogi who needs to get her shiz together 😂

Regarding the pain of this session, it was hard but I tapped into my breath again this week. I squirmed and wriggled but got it done! And it is worth every niggle if it means I will progress and give my body the care it needs.

This Friday will be interesting....

THE GLUTES!! 🙈


Competition!!!!

We are running the same competition as last week where one lucky person will win a free session with Kev worth €60!

All you have to do is follow us on the below social media platforms and enter by tagging a friend who would also like to win 🙌 Your tag is your entry and you can enter on all 4 platforms 😊 The more times you enter with a different friend tagged, the more chance you have of winning. Wooooooo!

Winner announced Friday evening the 20th of October.

Good Luck!

Instagram:

Facebook:

ps: This competition is only for those who can travel to Kev's office/gym in North Dublin.

Elisa x


Tuesday 10 October 2017

I got cupped! Week 1


Hold your horses, it's not as dirty as it sounds 😉

I am working along side Kevin McDermott, Co - owner, training coach and massage therapist at Compound Fitness in Dublin, to receive 6 weeks massage therapy called cupping.


(of course I went to find the most embarrassing photo of Kev.... I think this is on point 😂)


As well as giving you all the goss with this, we are giving away one free cupping session each week! So make sure you enter the giveaway via Instagram and Facebook. Both our links at the end of this post.


Before I tell you how I got on during my first session, here is Kev with some history and information about cupping, along with my beautiful back as the model 😋

Cupping

This style was developed thousands of years ago and though the techniques have modernised, the original philosophy remains the same.

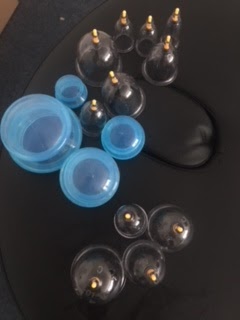
Cupping involves placing glass, bamboo or plastic jars on the skin and creating a vacuum by suctioning out the air. 


The underlying tissue is raised, or sucked, partway into the cup. 


The purpose of cupping is to enhance circulation, help relieve pain, remove "heat" and pull out the toxins that linger in your body's tissues.

Fixed Cupping:
The cups are placed on a selected area of your body and then left in place without being moved.

Moving Cupping or Active Cupping:
The cup or cups are moved up and down along the muscles.

Most people with today’s lifestyles suffer from various pains like neck pain, back pain, rheumatism, migraines, and other muscular pains. 
By getting cupping therapy, you might find that the pain is easing more effectively as compared to using modern medications.

Cupping targets deep tissues by creating suction and lifting the skin over the muscles causing the blood vessels and capillaries to expand. 
As the area receives a fresh infusion of blood, it is flooded with nutrients and oxygen that work to heal the damage and injuries. 


In addition, the blood carries away the accumulation of toxins, dead cells, and other debris that may be hampering the healing process and causing pain. 

As a result of better blood circulation, the tensed muscles and stiff tissues relax
Not only is the discomfort alleviated but the patients also sense relaxation that helps lower stress levels.
·    


Cupping Therapy helps tensed muscles relax and the improved blood flow will help give you relief from anxiety and stress.

·       Cupping to Promote Healing from Injuries

After we suffer an injury our body will react by swelling the area. This is actually increasing the blood supply that will bring healing elements and components to the damaged tissue. As a result we tend to treat the injury by reducing swelling and taking medication before the body has fully healed itself. Cupping works to cause inflammation in the tissues by drawing blood to the tissues and restarting the healing process.

So to summarise, the benefits of cupping are:
  • Pain relief
  • Promote relaxation 
  • Increase circulation
  • Increase oxygenation and tissue delivery
  • To cause micro trauma and beneficial inflammation
  • To stretch fascia and connective tissue
  • Loosen up muscles
  • Improve digestion
  • Increase detoxification
  • Decrease cellulite

Side Effects

I wouldn’t classify the cupping marks as bruises. The discolouration produced after cupping can be a result of build-up of toxins brought to the surface, stagnation, previous injuries, or lactic acid produced by the muscles. Redness and itching can occur due to the inflammation brought to the surface. The side effects of cupping are fairly mild. Bruising should be expected, but skin should return to looking normal within 10 days.

(The day of cupping)


My Experience

I was super pumped to get involved in this collab. Anything to help improve my circulation and tension. As much as I want to foam roll and have epsom salt baths every day, it just doesn't happen. 

So we began with my upper back per my request. I was due to be in yoga teacher training all weekend, I needed the use of my limbs 😂 As I have never really gone through cupping before, I wasn't sure if I would feel pain after.

Some of the tools used during Kev's sessions look scarier than they are. Hello table of torture 😀


But then you look around and see some essential oils and a buddha, it can't be all THAT bad?


You will book in for an hour session with a little chat before hand. 

Kev will begin to heat up the area through a normal massage before using the cups.
The sensation of the cups isn't unpleasant. It can slightly sting initially but it fades pretty quickly. Mine were left on for about 10 to 15 minutes. After taking them off Kev can see the spots that need more work.


You can see on my back in the picture above, my traps (shoulder area) and along my spine have the most tightness. And I knew that going in. I sometimes roll my back with a peanut ball and can feel the tightness. I also have a lot of tightness along my left lat too.  So the darker areas are the places that need a little extra tension release.

He will then continue to do some extra work through sports massage.

The cupping wasn't painful but like any massage, there is discomfort where there is tension being worked on. I may have said the odd "Oh my god" but I am pretty good with my breath. If I feel a tough one coming up I will tap into my deep breath! So I advise you try the same. 

Holding your breath will only cause more stress and strain in your body. The whole point is to relax into it and allow your muscles to relax. So use your breath along with Kevs techniques to get the most out of your experience 😊 Exhale as much as you can while the pressure is being applied. It REALLY helps I promise.

The verdict, well it's 3 days since I've had it done. My back feels great. I have less crackling on my left side that I had before and I do feel overall, more free in my upper back. It has definitely made a difference.

The colour has faded now to a yellow bruise. So plan your outfits around the area you are getting worked on haha!

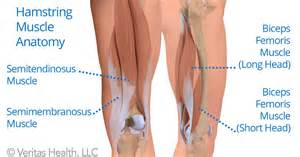
My second appointment is this week and we are focusing on my legs, to say they are tight is a understatement so hold tight for a very interesting read next week 😬


Competition Time 🙌

As mentioned above, we have one free session with Kev to give away each week. 

The entries will be collected from both of our social media platforms, put into an list and a winner will be selected at random every Friday! 

What do you have to do to enter?

Simply like our post, follow our social media platforms and tag a friend. That is all. Your comment will be your entry but you can't keep tagging the same person over & over.

I will be going through the lists and will take out any duplicate tags 😛 (but you can tag different people which will be a new entry for you.... get it?)

Kev's office is located in Coolock, North Dublin.

Good luck!!!!

4 ways to enter:


Look forward to sharing my leg session experience with you next week 👀

Let me know below or through our social media platforms if you have had cupping done before and what you got from it!!

Elisa x

Wednesday 4 October 2017

Yoga Asana Series - #5 Chaturanga


Chaturanga Dandasana

(chaht - ah- ron - gah)
(Don - dahs- anna)


When I began my yoga teacher training back in February, this is the posture I wanted to progress in the most. 
No fancy upside down stuff. A simple, easy, flowing Chaturanga. 

I am becoming stronger at it with practice & patience. I am very particular about doing this movement with correct alignment and always drop to my knees if I am feeling fatigued or losing my form. 

The reason I struggled with it is because my upper body was pretty weak.You need to remember the muscles in our body have to become stronger through practice. We can't expect to flow into postures easily without training our muscles. A few tips on this at the end of the post aside from a million Chaturangas 💪

Chaturanga Dandasana is known as four limbed staff pose in the English translation. 

It is a full body strengthening movement that relies a lot on core strength as well as upper body. Keeping your body in a straight line as you move towards the earth isn't as easy as it sounds!!!

Anatomy


Feet & Legs

  • Coming from your plank position we roll forward onto the tips of our toes while continuing to draw back through our heels. In this action we are lengthening through our feet along the back of our legs (our posterior chain) while contracting the front of our legs.
  • We want firm thighs with a slight inward rotation.
Note on muscles:

  • Without getting too technical with the muscle names, there muscle in the front of our lower legs beside our shin bones (tibialis anterior) which helps to create dorsiflexion in our feet. This muscle contracts to aid in this movement.


  • The forgotten about muscles in our feet help to bear the weight of our legs as we lean onto our toes.
  • Hamstrings (back thighs), Adductor (Inner thighs) and glutes (bum) contract to help keep our pelvis in a neutral position.
  • The glutes play a vital role in this posture. By engaging them as you lower down it will decrease the chance of tilting in the hips and extending the lumbar spine which in turn will help bring your spine back into a neutral position.
  • And of course the quads (front of thighs) get some work in too.


Pelvis

  • Aim to keep your pelvis neutral by engaging your glutes, legs (spoken above) and your core. And follow this straight line as we lower. Even if you are on your knees, still engage
  • Another issue in Chaturanga is that some people will dip their hips (like we do in upward dog) because the upper body is not strong enough to hold the posture as they flow towards the earth. This is when you should drop to your knees. You would be compromising your lower back (lumbar spine). If this was to be continually repeated, it will surely lead to injury over time.

Spine & Torso


  • We are using our spinal extensors in this posture. As you can see in the below picture, we have a lot of muscle surrounding our spine to protect it. 
Superficial = closest to the skin (I like to remember that term thinking of superficial people who are all about looks... their outer skin.... not rocket science eh?) 😉 


These muscles will work through this movement without you actually being aware!! And they are also those muscles we massage when we roll like happy idiots back and forth on our mat!! 😍

  • But the main muscles in our torso we can contract for this movement- the abdominals. Ah that love/hate relationship!!! We don't need to pull them in to the point we might puke, just a slight pull in through the navel towards the spine is all you need to stabilize.

Upper back & Arms:

  • You will feel your upper back slightly draw down when your arms begin to draw back and bend but you don't want to be forcing this action. By drawing the shoulder blades back actively can actually cause hyperextension in the lumbar spine. Just focus on keeping your spine straight!


  • Now - the good aul triceps (back of arms/bingo wings)!!! Most of the time if you can't get this pose right it can be due to lack of strength here. I for one have this issue but its improving. Below is a little set for you to practice at home a few times a week to help with tricep and some chest strength. Ensure you are warmed up so I would throw it in at the end of a yoga practice :)
  • The chest works here also as it is the eccentric phase of a push up. Your pecs. A term I am sure you've heard before. In this phase your chest muscles along with your shoulders & triceps are eccentrically moving so you don't face plant the floor!
  • The shoulders get a hit in this movement too. Our deltoids live her (shoulder muscles). All working together in that eccentric movement to help us to the floor with ease. Hence if we are weak here, we will find it very difficult! 
*One thing to note and it's not mentioned too much in any text I've read, but strengthening our biceps will really help with our chaturangas too*

Some terminology lessons 

Concentric = the muscle shortens and contracts (generally the hard phase of a movement example - the pushing up during a push up or coming up from a squat)

Eccentric = the muscle lengthens as it contracts (Tricep lengthens as you release slowing to the ground in a push up)

💡 Little tip for any gym goes or exercise bunnies out there - working the eccentric phase of a movement actually builds MORE strength. So slowing down the movement. Example is our chaturanga, releasing SLOWLY towards the ground is using the eccentric phase and therefore build strength in the tricep! Yipeeeee! So during the below 3 exercises, try and take them slower than you'd like.

___________________________________________

Easy Tricep/chest Workout: 

3 rounds of:

Tricep push up x 10 reps           


  • Stay on knees until you can build strength for toes. 
  • If being on your knees is too difficult, use a table top or the side of your bed to rise the earth up to you (incline). 
  • Engage core. 
  • Elbows by your waist, not out at an angle like a regular push up!


*Rest for 1 minute*


Tricep Dips x 10 reps                    

  • Again, using either the floor, a bench, the side of your bed, coming down at a 90 degree angle and using the tricep muscle to help you back up


*Rest for 1 minute*


Chest Press x 10 reps                     

  • If you have weights at home then great, if not, use cans of food, bags of sugar, water bottles..whatever you can find that is even weight between each hand. 

  • Lay on your back, arms at a 90 degree angle and push up your weighted items to the sky, ensuring they come in line with the end of your sports bra (for men, in line or just below your nipples). This way you are taking the weight out of your shoulders are concentrating more on your chest muscles to do the work


You can also go single arm on this bad boy to focus on each side separately like shown above. 
But in my opinion using this photo as an example, I would like your arm to come more out towards your torso like I spoke about above, rather than straight above the shoulder 😊

*Rest for 1 minute before repeating*

____________________________________________


Let me know if you give it a shot. 3 rounds of 3 exercises! Simple!😉 And for any gym goers out there, I have found using the tricep push down on the cable machine to be so effective in strengthening my arms 💪

(Add in a set of bicep curls to really take your chaturanga to the next level)

Anyways that's my personal training side shining through haha.... so back to yoga!!


Neck & Head

  • Neck is ALWAYS a beautiful extension of our spine so we should always work to keep it nice and neutral. This means no arching. So look forward, gaze down as you move through your flow of chaturanga.

Another tip I have seen for practicing Chaturanga is using a block. Working towards lowering yourself to the block. Simply practicing tricep push ups with a block a few times a week can really help.


Benefits of Chaturanga:
  • Teaches you and gives you a feeling of proper body alignment
  • Strengthens arms, legs and core
  • Prepares the body for arm balances 
  • Increases energy & stamina
  • Ignites heat in the body during warm up Sun Salutations
  • You feel bad ass when you can do it!

It's a mentally tough pose to master ad sometimes we don't want to give in and drop to our knees but PLEASE do if it means you are working on building strength. This is where Knees, chest, chin comes in.

Drop to your knees instead and lower chest to the floor while keeping hips high then swoop forward through your shoulders and arms.


This will encourage your body to feel the movement of rolling forward without the extra body weight.

Let go of the ego and listen to your bod!!

So that's it really for this one. I hope I didn't go into TOO much detail.

Let me know if you like the small little workout I threw in that you can do ANYWHERE. Comment below and I may just throw a few more workouts in as we go through the series! 😊


Be kind to yourself during practice. Practice makes progress, no one is perfect 💗

Lot's of love,

Elisa.


References:

Yoga Anatomy - Leslie Kaminoff & Amy Matthews
http://www.mystrengthtraining.com/bodyweight-exercises/dips/
https://animatedshoes.deviantart.com/art/face-plant-171816407
www.popsugar.com